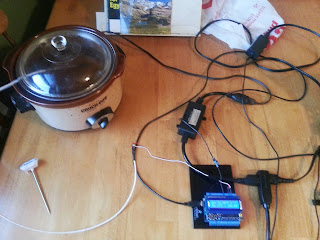
I've wanted to build a Sous Vide machine for some time, and after participating in a Kickstarter project for a vacuum sealer that uses Ziplock bags (ThriftyVac), it was time to do it.
 |
| The Arduino with LCD shield and |
Here's the thought process. You want to cook something in water for a long period of time. You want to control the temperature of that water. Well, if you hook a thermometer and a relay switch up to an arduino, and plug a crock pot into the relay, you can accomplish both of those things.
In short, the arduino will tell the relay switch when the crock pot should receive power and when it shouldn't. It does this based off of the thermometer that is resting comfortably inside of the crock pot. When you go over the desired temperature, the crock pot will turn off. When you are under the temperature, it turns on. Simple, right?
In my research, I found a number of different methods for pulling off this project. Most were from my favorite DIY site (Instructables).
- Arduino Sous-Vide Cooker This project really cut to the basics. It's got the arduino, thermometer, relay, and crock pot.
- Sous Vide Cooker for Less than $40 This was another option. It used a digital temperature controller purchased from Ebay (or Amazon) in lieu of the Arduino. An arguably "cleaner" approach but not quite as much fun as most of the DIY comes in putting together the box that houses the unit.
- Adafruit Sous Vide This is the option I went with. Adafruit, an excellent website for purchasing electronics and other kits from, had a tutorial for programming and building the various shields necessary for the project. They also had some pretty cool code written up to control the beast.
 |
| The total setup |
It took me a couple of days to put the stuff together, but once it was done, I was ready to test it out. I plugged the contraption in when I woke up, and by the time I was ready to go to work, I discovered that it worked, but also that it tended to overshoot the desired temperature.
This, of course, was expected. If you think about it, the crock pot is designed to heat foods up to maybe 200 to 300 degrees F. And, they are designed to retain heat. So as it's warming up, it's hotter than the water which it is warming and even if you turn it off, like a train, it's going to keep barreling forward for some time. And, the ceramic bowl is going to retain that heat for some time even after it's turned off.
The magic of the Adafruit programming is that they try to control for this with some interesting PID programming that you can adjust based on what you are using (i.e. Crock Pot, Rice Cooker, Heating Plate, etc). I would say that, after using the unit twice, it's still not perfect, but it's a lot better than the first time.
The first food that I cooked in the Sous Vide was a fillet of Tilapia that came pre vacuum packed. I dropped this into 60 degrees C water and cooked it for an hour. And, it was really good. The fish was perfectly cooked and amazingly flaky.
I found some helpful information on Sous Vide Cooking at these websites:
My second attempt at Sous Vide used a vacuum sealed steak. This was cooked at 54.5 degrees C for about an hour. And, it was good, but I don't know if I thought it was amazing.
Anyhow, the project was a success. I may consider purchasing a rice cooker in the future. I believe that it will heat up faster than the crock pot, and perhaps not overshoot as much. Right now, it takes about 2 hours to stabilize the water temperature. That isn't bad, but it does require some planning if I want to use it.
And, I also want to write some basic code for the Arduino so that, even if it's not as fancy as the adafruit code, I can at least learn how to take temperature readings and control a LCD shield.
No comments:
Post a Comment